
Introduction
By the time you’re reading this, I’ve already shared a few updates on my RSN appliqué progress. But as I went along, I realised it might be confusing to follow without first knowing what the RSN actually expects from the module. So I’m taking a step back here: this post gives you the background, the official brief, and why I chose my design. Hopefully, it will make the later updates clearer. For an overview of all my appliqué posts in one place, visit RSN Diploma Appliqué: Techniques, Progress & Embroidery Journey.
Starting the appliqué module of the RSN Diploma in Technical Hand Embroidery felt like stepping into a different world. Where many modules focus mainly on stitches, appliqué is all about fabric choice, layering, and texture.
It’s also worth noting that appliqué stands somewhat apart from the other Diploma modules. None of the others really involve layering or applying fabrics in this way. Some skills do overlap (for example, padding techniques), but for the most part it’s a fairly self-contained challenge.
The RSN Appliqué Brief
The appliqué module brief is, as usual, very specific in some areas and quite open in others. The piece must not exceed about 40 cm / 16 in square (which feels huge when you think of filling it with fabric!).
Within that space, students are asked to use at least four different fabrics — plain, printed, dyed, distressed, painted, sheer, or varied fibres such as silk, cotton, or linen. On top of that, the design must include at least three types of padding to add dimension, such as wadding, Trapunto (worked directly on the piece), felt, or Vilene.
Another key requirement is the use of edges — stitched finishes that cover the raw joins of the fabrics. Edges keep the appliqué neat and secure, prevent fraying, and also give the stitcher a chance to demonstrate technical variety. At least four different edges are required, with minimum continuous lengths. These include couched, turned, frayed, or corded edges, as well as embroidered ones like satin stitch, buttonhole, long and short, heavy chain, or stem stitch.
Students can enrich their piece with extra touches such as quilting, surface embroidery, beads, or sequins, as long as appliqué remains the main focus.
In short: appliqué isn’t just about layering fabrics, it’s about making them work together through thoughtful padding, secure edges, and careful finishing.
My Design Choice: The Cheshire Cat
For my own piece, I wanted something playful that could handle both texture contrasts and bold outlines. The Cheshire Cat from Alice in Wonderland quickly became the perfect candidate.
I’ve always loved his mischievous sayings, so I decided to incorporate some text into the design. After reviewing several illustrations, I chose one with clear outlines, distinct colour blocks, and real depth in the composition as my starting point. That balance gives me space to explore fabrics, padding, and edges — while still keeping the character recognisable.
I did make some changes to adapt it for embroidery. I removed a cluster of small mushrooms that cluttered the foreground and expanded the image to make it more square, sketching in the rest of the cut-off mushrooms along the sides. And of course, I simplified the grass: it has to be worked in fabric, not thread, after all.
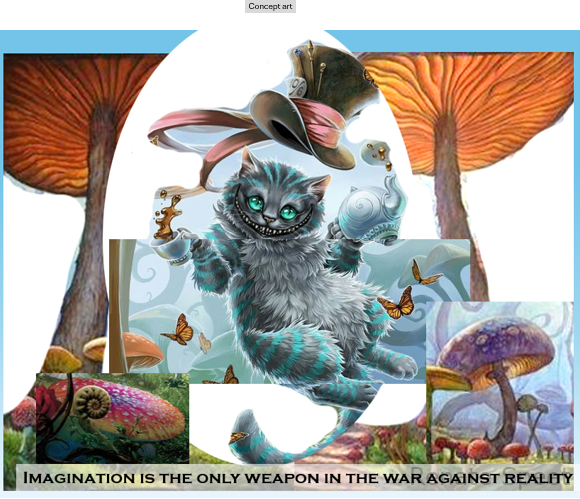
You can see a concept design here. From there, I made a detailed tracing of all the elements I wanted in the final piece, adjusting placement and scale until they felt right. I then created a coloured drawing to test the palette — and that’s when the fabric hunt began. I raided my stash and searched fabric shops near and far to find the right textures and shades. To keep track, I pinned small swatches along the edge of my coloured drawing, so I’d remember which fabric was meant for each section (especially handy when some colours looked quite similar).
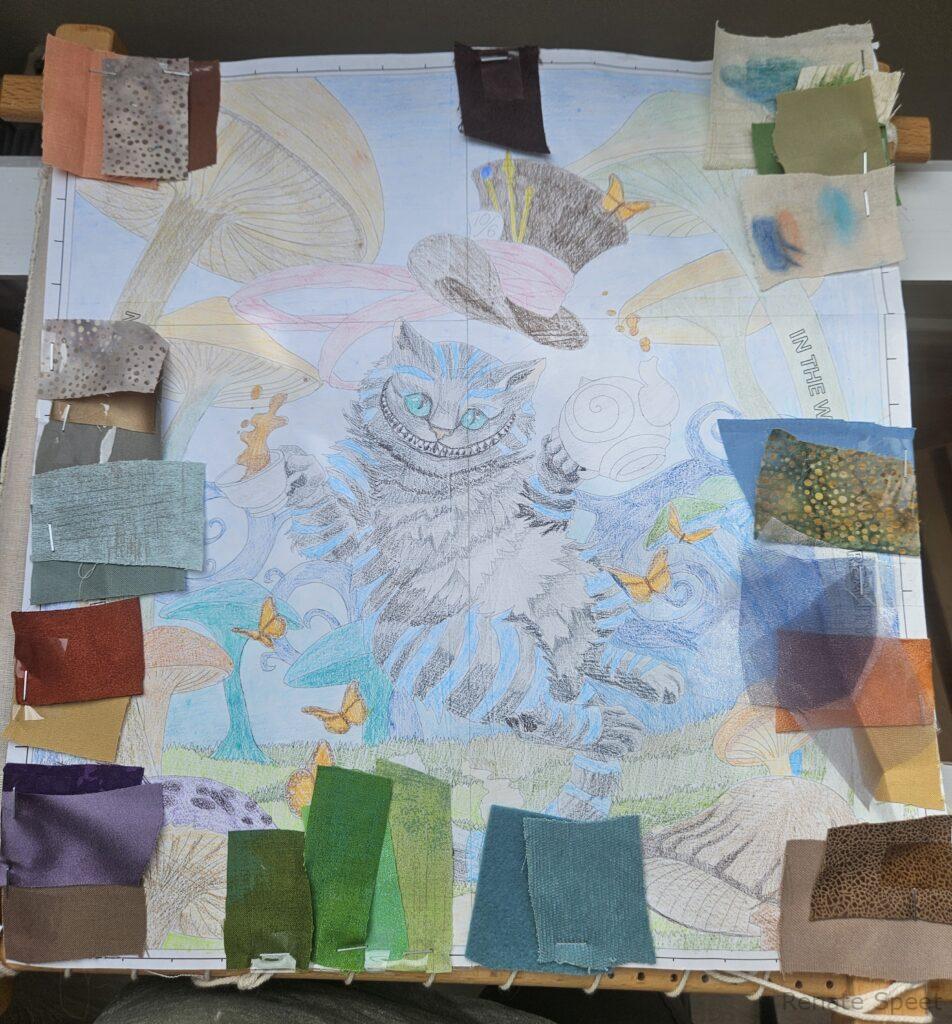
At that point, I felt ready to begin sampling.
Looking Back & Ahead
Since this post is coming later than the work itself, you can already find some of my earlier explorations: experimenting with fabrics, testing different paddings, and trialling edge finishes. If you’d like to catch up on those, here are a few links:
- First Steps in Appliqué embroidery – Starting the Diploma at RSN
- Lessons in Appliqué: From Wonderweb Organza to Trapunto Padding
- Experimenting with Appliqué techniques: Trying Out Methods for Neater Edges
- From Mushrooms to Cats: Exploring Appliqué Embroidery Techniques in Class
You can also find all updates collected on RSN Diploma Appliqué: Techniques, Progress & Embroidery Journey.
And what’s still ahead? Stitching the heavily padded mushrooms, and of course bringing the Cheshire Cat himself to life.